FAQ
A number of frequently asked questions are summarized on this frequently asked questions page. In addition, other information is available such as manuals and installation instructions. If your question is not answered here, please contact us at info@blueppw.com. Questions about the following topics are explained: Webshop, Malfunctions, Installation of roll-up systems, Electronic connection, Manuals.
Webshop
Create an account
You need an account to place an order in our webshop.
Please send an extract of your Chamber of Commerce details by e-mail to: info@blueppw.com. We will then create an account for you and you will receive the login details.
Place an order
Orders must be placed in the webshop. Below is a step-by-step explanation of how to order a roll-up system.
Go to: https://www.blueppw.com/en/ and choose under categories > Pool drive systems
Then go to Pool drive system configurator
- Enter the finished pool size (pool width) in the first field
- In step 2 you select the needed motor power. If not known, this must be calculated. Click on the blue field “calculate your engine power here”
- Fill in the length and width of the pool
- Select the image corresponding to how the drive system will be placed in the pool
- Specify the sizes (A, or A, B and C)
- Choose the right type of slats (PVC or the different polycarbonate versions)
- Click calculate, then close the calculator and select the needed motor power
- In step 3 you choose the cable length (note, if the cable is too short, you must extend it, which increases the risk of failures)
- In step 4 you choose whether a mounting set should be included
- Select the correct mounting set here
- Indicate here whether a pre-assembly set is desired (block bath)
- Select the correct mounting set here
- Additional options, if needed, choose:
- remote control
- key switch
- Guide bracket
- Select the desired guide bracket
- Place this whole in your shopping cart.
In the overview of the shopping cart you can select whether the order should be picked up or shipped. Any order notes or reference numbers can be entered in the next step (checkout).
Accept the terms and conditions and place your order.
Questions about your order?
Do you have questions about your order?
Mail your question with order number to info@blueppw.com. We will get back to you as soon as possible with an answer to your question.
Malfunctions
The control box shows an error message
Error messages on the control box:
A fault is indicated by the simultaneous flashing of the LEDs next to the programming keys. An error message according to the table below appears on the display. With every malfunction, the first step is: switch off the power and check the fuse.

Other faults are in many cases caused by improperly extending the motor cable. Extending the cable carries the following risks:
- Bad connections of the cables
- Moisture can enter the cable if the junction box is not waxed properly (note: warranty expires if moisture in the cable)
- The wrong cable can be connected.
Roll-up system installation
Installation pool drive system - Concrete/liner pool
Follow the steps below to install the pool drive system.
Installation mounting kit:
- Mark the correct position and drill the holes
- Place the plugs in the drilled holes
- Use Teflon tape for connection
- Fasten the mounting kit with the enclosed bolts
- Then assemble the other side in the same way
Roll tube installation:
- Place the roller tube on the non-motor side, place the bolt
- Carefully place the roller tube on the motor side and in front of the cable. Install the bolt. Note: make sure that the cable remains free
- Screw the nuts onto the bolts
Assembly completed.
Please note: the adjusting ring shown in the video is not included as it is not required.
Installation pool drive system - Prefab pool
Follow the steps below to install the retractor.
Installation mounting kit:
- Mark the correct position and drill the holes
- Place the counter flange (prefab bath) with the rubber gasket on the outside
- Then also place the counter bearing with rubber gasket on the inside
- Screw it on with the supplied nuts
- Then repeat this on the other (motor) side
Roll tube installation:
- Place the roller tube on the non-motor side, place the bolt
- Carefully place the roller tube on the motor side and in front of the cable. Install the bolt. Note: make sure that the cable remains free
- Screw the nuts onto the bolts
Assembly completed.
Please note: the adjusting ring shown in the video is not included as it is not required.
Installation pool drive system - Block EPS pool
Follow the steps below to install the retractor.
Installation mounting kit:
- Mark the correct position according to size and drill the holes
- Make sure the holes are level and well perpendicular
- The embed must be placed level.
- Attach the back of the embed
- And then also the rubber bearing flange with rubber gasket
- Then assemble the other side as well.
Roll tube installation:
- Place the roller tube on the non-motor side, place the bolt
- Carefully place the roller tube on the motor side and in front of the cable. Install the bolt. Note: make sure that the cable remains free
- Screw the nuts onto the bolts
Assembly completed.
Please note: the adjusting ring shown in the video is not included as it is not required.
Connect electronically
Connect electronically - Control cabinet
Follow the steps below to connect the motor and program the control box.
Connecting cabling:
- Insert the orange cable through one of the glands
- Connect the cables as shown below:
- Black left on green block (1) – Thick cable (2.5mm2)
- Blue right on green block (1) – Thick cable (2.5mm2)
- Blue at position: 1 – Thin cable (0.5mm2)
- Black at position: 2 – Thin cable (0.5mm2)
- White in position: 3
- Red at position: 4
- Green at position: 5
Programming open and close position:
- Red PROGRAM button 3 sec. keep pressed
press OPEN. - The red light of the OPEN button will light up
- Also check that the direction of rotation is correct. If not, the power supply must be swapped (thick blue and black cable)
- When the desired OPEN position is reached, stop the motor with the same button
- Turn the system OFF and ON. This is how the position is saved
- Then repeat these operations for the CLOSED position
- Save both settings by pressing the program button 3x
- Then test whether both modes are programmed as desired
Installation completed.
Connect electronically - Remote Control (2-channels)
Follow the steps below to connect and program the remote.
Connecting remote control:
- Turn off the power
- Work through cabling under the printed circuit board
- Stick the receiver in the control box
- Connect the cables as shown below:
- Gray at position: 11
- Blue at position: 7
- Purple in position: 6
- Add the red and the black cable with the red (+) and black (-) cable to the 24VDC terminal on the top right of the PCB
- Turn on the power
Programming remote control:
- To clear all previously paired signals, press and hold the button on the received one for about 15 seconds
- To link the open button, click 1x on the button of the receiver. Then click on the desired button on the remote
- To connect the close button, click twice on the button of the receiver. Then click on the desired button on the remote
- If this does not work immediately, repeat steps 1, 2 and 3
Connect electronically - Key switch
Follow the steps below to connect the key switch.
- Turn off the main switch
- Connect the cable as below picture
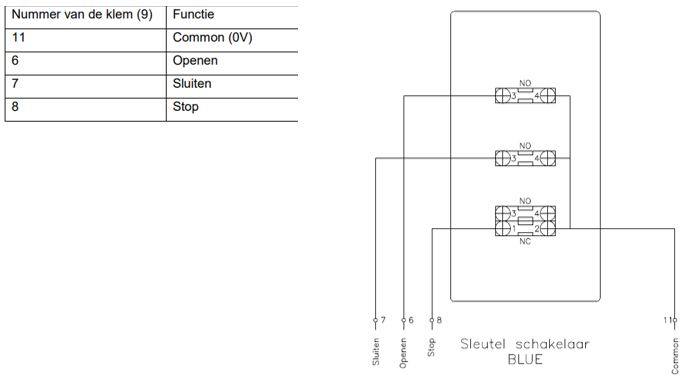
- Make sure the tab under the key switch is pierced on the connected side
- Feed the cables through one of the cable glands in the control box
- Connect the cables as shown below:
- Green at position: 6
- Yellow at position: 7
- Blue at position: 8
- Red at position: 11
- Turn on the main switch
Extending the motor cable
The motor cable may be extended to a maximum length of 35 metres. Loose cable to extend is available in the webshop. If you want to extend with another cable, check whether the thickness of the cables corresponds. Make sure that colors match.
The connection of the cables must be perfect. Control current flows through the cables and is extremely sensitive to power loss. In addition, the connection must be made in a junction box that is resined off.
98% of the faults are caused by incorrectly extending the motor cable. Extending the cable entails the following risks:
- Bad connections of the cables
- Moisture can enter the cable if the junction box is not waxed properly (note: warranty expires if moisture in the cable)
- The wrong cable can be connected
Manuals
Manual - Control cabinet
Manual - 4 channel remote reset and reprogram
Follow the steps below to reset and reprogram a channel key fob and receiver
Reset:
- Press the blue button on the top right of the receiver circuit board for 35 seconds
- Wait for all 4 lamps to light up. The memory is now cleared
Reprogram:
- To program the retractor (channels 1 and 2), turn the red wheel to the tip position
- Press the blue button to program the desired channel (light stays on after selection). We start with channel 1
- Press the desired button on the remote control and the light on the receiver will flash, release the button when the light is off. Channel 1 is now programmed
- Channel 2 goes the same way. First select the correct channel with the blue button. Then repeat steps 2 and 3
- For channel 3 (e.g. for lamps) the red wheel must be in position Tog. be placed
- Then repeat steps 2 and 3
- For channel 4 (eg for other) the red wheel can be moved to position Tog. be placed.
- Then repeat steps 2 and 3